Condensation is a common issue in homes across the UK. While it may seem harmless at first glance, persistent condensation can lead to problems such as mould growth, damage to paintwork, and even structural deterioration. Understanding what causes condensation and how to address it is essential for maintaining a healthy and comfortable living environment. This blog will delve into the science behind condensation, its causes, and practical solutions to prevent it.
What Is Condensation?
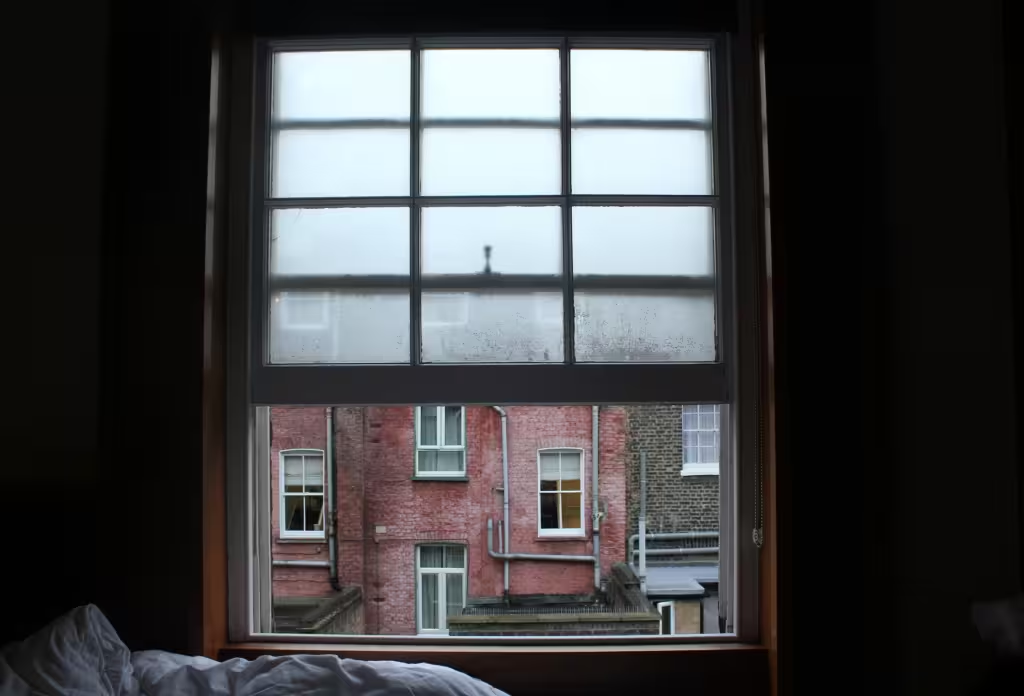
Condensation occurs when warm, moist air comes into contact with a cooler surface, causing the water vapour in the air to cool and convert into liquid droplets. This phenomenon is most noticeable on surfaces such as windows, walls, and mirrors. It is essentially the reverse process of evaporation, where water changes from liquid to gas.
In our homes, condensation is a natural occurrence, especially during colder months when indoor and outdoor temperatures contrast sharply. However, while some level of condensation is normal, excessive condensation can indicate an imbalance in your home’s humidity levels or inadequate ventilation.
Causes of Condensation in the Home
1. High Humidity Levels
Homes naturally generate humidity through everyday activities. Cooking, showering, drying clothes indoors, and even breathing release moisture into the air. When this moisture accumulates, it raises the indoor humidity level, increasing the likelihood of condensation.
2. Temperature Differences
Condensation forms when warm air meets cold surfaces, such as single-glazed windows or poorly insulated walls. This temperature differential cools the air, forcing it to release moisture. For example, during winter, the warm air inside your home collides with the cold glass of your windows, creating droplets.
3. Poor Ventilation
Homes with inadequate ventilation trap moist air, preventing it from escaping and encouraging condensation. This is particularly common in modern, energy-efficient homes that are designed to retain heat but may lack proper airflow. Bathrooms and kitchens are especially prone to condensation if they lack extractor fans or windows that open.
4. Building Materials and Design
Certain building materials, such as concrete and brick, retain cold temperatures longer than others, making them susceptible to condensation. Poorly designed or ageing homes with insufficient insulation also contribute to condensation issues.
5. Seasonal Changes
Condensation problems are more common in colder months because warm indoor air holds more moisture. When this moist air meets cold surfaces, condensation is more likely to occur.
6. Lifestyle Factors
Some habits, like keeping windows shut all the time or overusing humidifiers, can inadvertently increase indoor humidity. Additionally, crowded living spaces produce more moisture, making proper ventilation essential.
Effects of Condensation
If left unchecked, condensation can lead to various problems, such as:
- Mould Growth: Damp surfaces are a breeding ground for mould and mildew. Not only are these unsightly, but they also pose health risks, particularly for those with respiratory conditions.
- Peeling Paint and Wallpaper: Persistent moisture can cause paint to bubble and peel, while wallpaper may lift and lose adhesion.
- Structural Damage: Over time, excessive moisture can weaken walls, ceilings, and wooden frames, potentially leading to costly repairs.
- Unpleasant Odours: Damp areas can develop musty smells, making living spaces less inviting.
- Health Concerns: Prolonged exposure to damp environments can exacerbate asthma and allergies, particularly in children and the elderly.
How to Solve Condensation Issues
1. Improve Ventilation
Proper ventilation is key to controlling moisture levels in your home. Here are some steps to enhance airflow:
- Use Extractor Fans: Install extractor fans in kitchens and bathrooms to remove steam directly at the source. Make sure they are vented outside.
- Open Windows Regularly: Allowing fresh air to circulate helps reduce humidity. Aim to ventilate your home daily, even during colder months.
- Install Trickle Vents: Many modern windows come with trickle vents that allow continuous airflow without compromising security.
2. Reduce Humidity
Lowering the amount of moisture in your home can significantly minimize condensation:
- Use a Dehumidifier: Dehumidifiers extract moisture from the air, making them an effective solution for rooms prone to dampness.
- Dry Clothes Outdoors: Whenever possible, dry your laundry outside to avoid releasing moisture indoors. If this isn’t feasible, use a vented tumble dryer or place clothes in a well-ventilated area.
- Cover Cooking Pots: When boiling or steaming food, use lids to trap steam and minimize moisture release.
- Avoid Overwatering Plants: Indoor plants contribute to humidity, so be mindful of how much water they receive.
3. Increase Insulation
Proper insulation reduces the likelihood of warm air meeting cold surfaces. Consider these upgrades:
- Double or Triple Glazing: Modern windows with multiple panes of glass provide better insulation, preventing cold surfaces where condensation can form.
- Insulate Walls and Roofs: Adding insulation to walls and loft spaces helps maintain a consistent indoor temperature, reducing condensation risk.
- Install Insulated Curtains or Blinds: Thick curtains and thermal blinds create an additional barrier between warm indoor air and cold windows.
4. Heat Your Home Consistently
Maintaining a consistent temperature throughout your home prevents sudden changes that lead to condensation. Set your thermostat to a stable level, even in rooms that aren’t frequently used.
5. Address Specific Problem Areas
Certain spots in your home may be more prone to condensation:
- Windows: Use a squeegee to remove moisture from windows each morning and wipe down any lingering droplets with a cloth.
- Bathrooms: After showers, keep the door closed and the fan running to vent out steam.
- Kitchens: When cooking, use the range hood and keep lids on pots to reduce steam.
6. Use Anti-Condensation Products
Specialised products can help manage condensation:
- Anti-Condensation Paint: Apply this to walls prone to dampness. It helps prevent water buildup and reduces mould growth.
- Window Film: Transparent film can add an insulating layer to single-glazed windows.
7. Fix Underlying Structural Issues
Sometimes, condensation problems stem from the structure of the home itself:
- Repair Leaks: Check for leaks in the roof, plumbing, and windows, as these can contribute to excess moisture.
- Upgrade Gutters: Ensure gutters and downpipes are clear and functioning properly to prevent water from seeping into walls.
Long-Term Maintenance and Prevention
Once you’ve tackled existing condensation issues, maintaining a condensation-free home requires consistent effort:
- Regularly check for signs of dampness, particularly in corners, behind furniture, and in basements.
- Clean extractor fans and dehumidifiers to ensure they work efficiently.
- Monitor indoor humidity levels using a hygrometer. Aim to keep relative humidity between 30% and 50%.
- Consider professional advice if condensation persists despite your efforts. A building surveyor can assess your home for deeper issues.
Conclusion
Condensation is a common but manageable problem in homes. By understanding its causes and implementing practical solutions, you can create a healthier, more comfortable living environment. Whether it’s improving ventilation, reducing humidity, or investing in insulation, taking proactive steps can prevent the damaging effects of condensation. Addressing the issue promptly will not only protect your home but also ensure the well-being of everyone living in it.